Online & Mobile Banking Reference Guide

Latest Enhancements
✓ Available Balance displays more prominently than Balance
✓ Actual Transaction Dates shared instead of Today vs. Yesterday
✓ Ability to print estatements from your iOS device
✓ Perform transaction searches within a specific date range
✓ Face ID automatically opens the app without also having to click
Using the System
If you want to use Mobile Banking, first download the blue app on the app store; search “Coast Central Mobile Banking.”

If you’re unable to locate the app, use these links:
Apple: https://apps.apple.com/us/app/coast-central-mobile-banking/id6474883132
Google: https://play.google.com/store/apps/details?id=com.softek.ofxclmobile.coast
What if I need assistance?
Our friendly experts are here to help! Click the Owlbert ChatBot in the lower right of any page of our website or call us at (707) 445-8801 Monday – Friday, 8 am – 6 pm and Saturdays 10 am – 3 pm.
Quick Reference Guides: How Do I...
The new system does not support Firefox, so some functions will not work optimally, and we recommend using Chrome. If you need to use Firefox and are having issues with the Login button or other functions, either refresh your browser by clicking “Ctrl + Shift +R” or go directly to the login link at https://digital.coastccu.org.
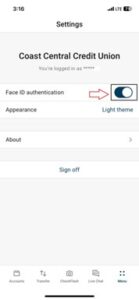
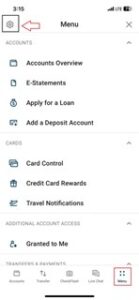
- From the Menu, click the Settings (gear) icon in the upper left of the Menu.
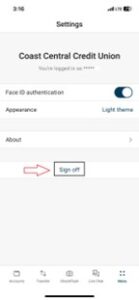
- Toggle Face ID authentication. Select OK to accept the Security message, and then authenticate via Face ID to fully enable the feature.
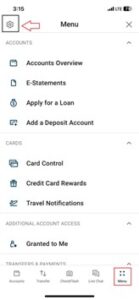
- From the Menu, click the Settings (gear) icon in the upper left of the Menu.
- Select Sign-off and then confirm.
Hide Accounts (for those you don’t need to manage often):
- Click the Filter icon at the top right, then “Display Options.” You’ll see a comprehensive list of accounts on which you are an owner (primary and joint).
- Click the eyeball to hide or show available accounts.
Create Groups (For easier organization):
- Click the Filter icon at the top right, then “Manage account grouping”.
- Follow the prompts to create and name the group.
- Click and drag specific accounts into the group using the 2 parallel lines on the lower right of each.
Order of Accounts (to customize the order of the way your accounts are displayed):
- Using the 2 parallel lines on the lower right of an account, click and drag to your preferred spot.
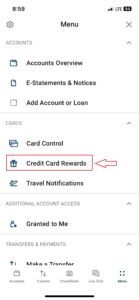
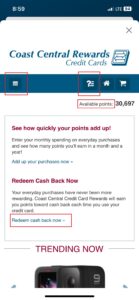
- From the Menu, under Cards, click Credit Card Rewards.
- Click Open.
- Your total available points are shown in the upper right.
- To redeem points for cash/deposit into your Savings Account, click “Redeem cash back now.”
- To redeem points for merchandise, travel, experiences, and more, click the () in the upper left and click on “Redeem rewards.” Choose the category you’d like to browse.
- Questions? Click the question mark near the top to see FAQs or access the Rewards Customer Service phone number.
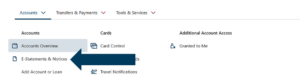
- From the Menu; click Accounts, then click E-Statements and your desired account (if applicable).
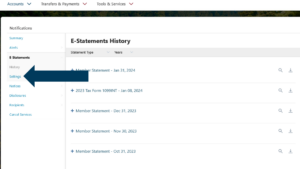
- Click on Menu in the upper right.
- Click on E-Statements, then Settings.
- Complete your delivery preferences (Email or SMS Text), and Save Changes.
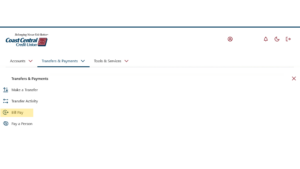
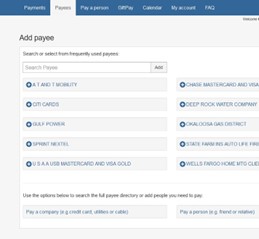
- From the Menu, under Transfers & Payments, click on Bill Pay.
- Select your account (if applicable).
- Click to Open the session.
- If this is your first time, Get Started with providing required information and accepting Terms & Conditions. Click Accept.
- Click Add a Payee and Continue.
- Search or click on a payee listed.
- Provide your account number information and Submit.
- To make a payment, Click Schedule a Payment and follow the prompts.
- Click the 3 dots next to the name of the Payee to choose which account to debit from, amount and date. You may set up payments in advanced using the calendar as well as recurring payments using the “Make it recurring” tab.
- Click Pay All and you should receive a Confirmation page with “Success.”
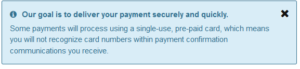
Note: you may receive a notice like the one below for certain payees who do not accept electronic ACH but do accept single-use virtual payment cards. Bill Pay works with vendors to determine which method of payment they prefer to ensure efficient payments for all.
- From the Menu under Transfers & Payments, click on Bill Pay.
- Select your account (if applicable).
- Click to Open the session.
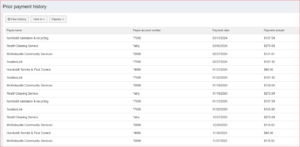
- At the bottom of the Payees page, click on View history.
- Click on the “For Payment History Prior…” link.
- Up to six months of history will appear.
- Your existing payees will automatically carry over to the new system.
- Six months of your Bill Pay history will also transfer over to the new system.
- For those payments for which the biller sends the bill electronically, you will need to reestablish each biller. After 1-3 payments within the new system, you will be prompted to reestablish your E-Bills.
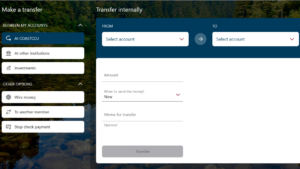
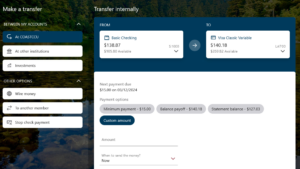
- From the Menu; click Transfers & Payments, click on Make a Transfer.
- Choose to transfer between your CCCU accounts, to another member’s CCCU account*, from your CCCU accounts to those at other institutions, or to wire funds.
- Click on your desired option and follow the prompts. For other member accounts, if inclusing the Share or loan ID, be sure to enter exactly as shown, with a “S” or “L” and a colon (S:1000).
- Note: to enter a number that includes cents, use the decimal point in the lower left.
*When you choose Another Member, you may click on Manage Payees and then Add New Payee for the convenience of establishing links for frequent transfers.
- Recurring transfers to other members and other accounts previously set up will continue.
- You can continue to make same-day transfers between your deposit accounts, from your deposit accounts for loan payments, and to accounts at other institutions. These should all process as normal. Additionally, real-time transfers to individuals will be available again.
- From the Menu; click Transfers & Payments, click on Make a Transfer.
- Choose At COASTCCU.
- Complete the information, choosing which account you want to debit and which loan account you’d like to make a payment on as well as other pertinent info.
- Click on Transfer; if all looks good, click on Confirm. You should received a “Transfer successful” message.
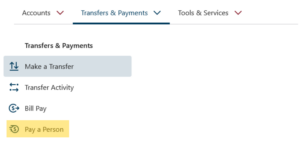
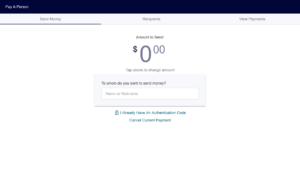
- From the Menu, under Transfers & Payments, click on Pay a Person.
- Choose which account you’d like to use (if applicable).
- Enter the amount you want to send at the top, then complete the information about your payee, include name, email address or mobile phone number, and an optional message.
- Click on Continue to the next step.
- Create a secret word for your payee to use for security, then choose how you will receive it.
- Enter the 4-digit code and finalize the payment by clicking on Authenticate User & Send Payment Request.
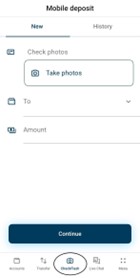
- Click on CheckFlash and read key information, including endorsement requirements on the back of the check, then click “Got It”.
- Click Take Photos, then follow the prompts to line up the check with your camera. The photo will be automatically taken if the check is lined up with the template correctly. Repeat for the back of the check.
- Complete the To/account info and the amount, then Continue.
- Confirm the deposit. Note that you may also review your previous mobile deposits under History at the top.
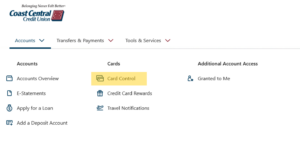
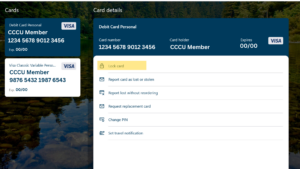
- If you suspect fraud and would like to suspend one of your cards, from the Menu; click Accounts, under Cards, click on Card Control.
- Your CCCU credit and debit cards should be listed. Choose which one you’d like to manage.
- From the list of options, choose Lock card and follow the prompts.
Note: within Card Control you can also conveniently report a card lost or stolen, change a PIN and set Travel Notifications.
- From the Menu; under Accounts, click the Account Overview, and click on the Checking Account from which the check was issued.
- On the detail screen, click on the 3 dots and then Stop Check. Complete the required information.
- Click on Stop check payment.
Note: There is a $25 fee.
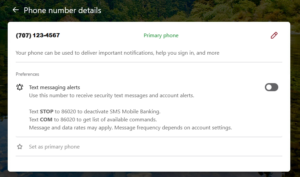
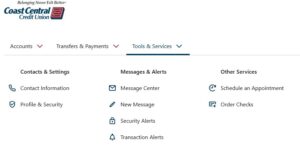
- From the Menu; under Tools & Services, click on Contact Information.
- Click on Phone.
- Add your mobile phone number, and click to get to the Phone number details screen.
- Toggle to enable the alerts and follow the prompt to enter a security code to complete the set-up.
In Mobile:
- From the Menu, click the Settings (gear) icon in the upper left of the Menu.
- Click the About arrow.
- The routing number will be displayed near the bottom.
In the desktop version, the routing number is displayed at the bottom of each page.
Account Display Screens
These are some commonly used screens within Online and Mobile Banking. Review these and others in the Quick Reference guide for easy “How-Tos”.
Summary
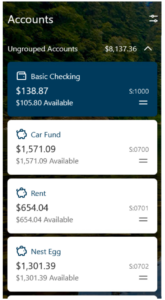
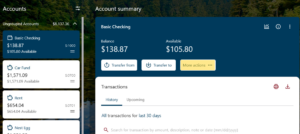
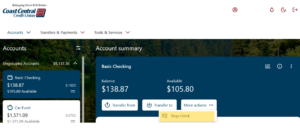
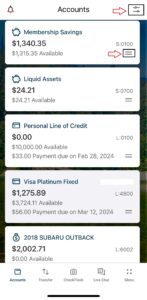
To view pending items, click on an account, then Pending/Upcoming. From the account detail screen, up to three years of transaction history is available to view, but defaults to the last 30 days. To edit, click “last 30 days” and choose desired duration.
Order & Grouping
If you’d like to change the order of the way your accounts are displayed, hold down on the two parallel bars on the lower right of an account and move to your preference. You can make changes at any time.
If you’d like to create groups of accounts or hide any accounts, click the ![]() icon and follow the prompts.
icon and follow the prompts.
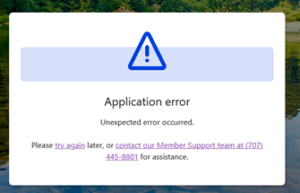
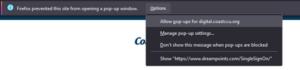
Computer Pop-ups
If you are experiencing unexpected errors when trying to access different areas of Online Banking, it may be due to pop-up settings on your browser. When the error happens, you should see a banner near the top of the screen stating that a pop-up has been blocked. Choose the option that allows pop-ups for digital.coastccu.org (see example below). Next reload the page and the error should no longer appear.
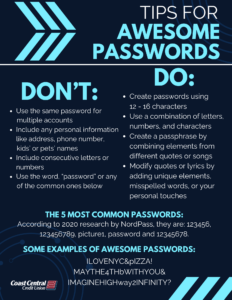
Tips for Awesome Passwords